Ingredients
For The Filling
- ¼ cup red bell peppers
- ¼ cup yellow bell peppers
- ¼ cup capsicum
- ¼ cup corn frozen or boiled
- 1 cup grated mozzarella cheese
- ½ teaspoon red chilli flakes
- 1 teaspoon oregano/ mixed herbs
- salt to taste
Garlic Butter & Oil
- 4 tablespoons olive
- 2 tablespoons butter
- 1 tablespoon red chilli flakes
- 1 tablespoon oregano
- 4 tablespoons garlic finely chopped
- 2 tablespoons coriander finely chopped
Rest Of The Ingredients
- 2 Large Burger Buns
- 2 Pav
Note– Please read recipe notes in the end.
Main Equipment Used
- Tefal Non-Stick set of 5: https://amzn.to/2Y7mZuX
- Induction cooktop – I use Morphy Richards 1600 Watt Cooktop. You can find it on Amazon here: https://amzn.to/2Jkn4px
Steps In Making
For The Filling
- To prepare the filling in a bowl add all the finely chopped vegetables, red and yellow bell peppers, capsicum, frozen or boiled corn along with oregano, red chili flakes, salt and grated cheese.
- Mix till everything is well combined. The cheese filling is ready.
Garlic Butter & Oil
- In a pan heat olive oil and butter on medium- low flame.
- Add red chilli flakes, oregano and toss them for a minute.
- Now add finely chopped garlic and saute for 2 minutes until all the aroma and flavour of the garlic and the herbs is infused in the oil and butter.
- Switch off the flame and add fresh coriander.
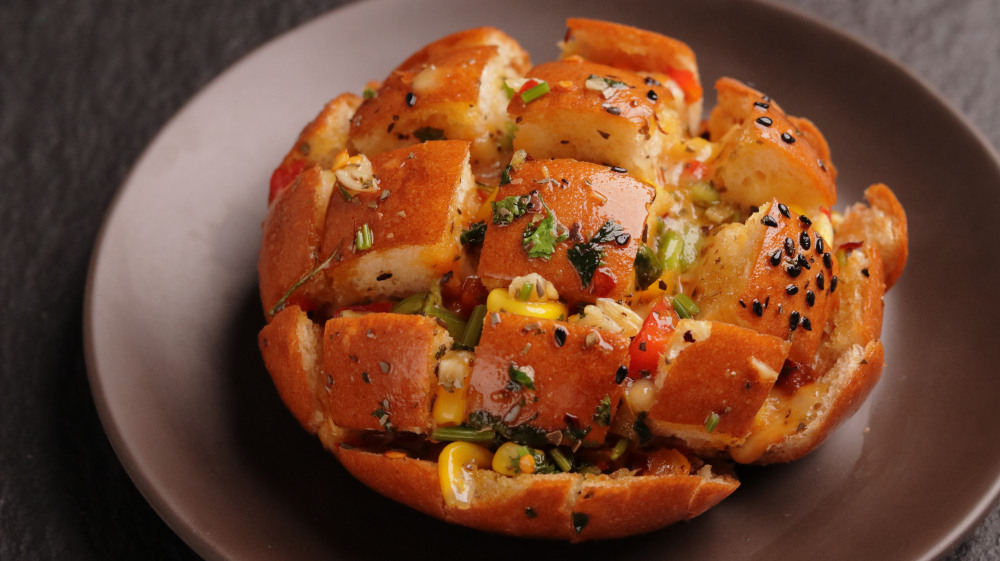
Assembling
- Take the burger buns and pav and with a sharp knife make square cuts,
- Now fill it with the cheese filling we prepared.
- Place the buns on the tawa and generously brush it with the garlic butter.
- Cover it with a lid and let it cook on low flame for 5-6 minutes or until the cheese melts completely.
- Once done, brush some more garlic butter and serve immediately.
Recipe Notes
- You can use processed or cheddar cheese.
- Add any vegetables of your choice. If you dont like any vegetables then you can fill the buns only with cheese too.
- Do not cook the butter oil on high flame else it will burn and you wont get the same flavour.
- Can use any bread of your choice for this recipe.